
Make a Custom sewing machine cover
Featuring the Cosmic Cactus Pillow Block
When I discovered Louise Jennings @prairieflowerstitchery had made a sewing machine cover featuring the Cosmic Cactus pillow block, my first thoughts were ‘Wow that looks so amazing’ and ‘What an awesome idea’. I approached Louise and asked her if she could write out the instructions to share on my blog. Together we have put together this tutorial, so now you can make your very own custom sewing machine cover.

Sewing machine cover by Louise Jennings @prairieflowerstitchery
Materials Needed:
Cosmic Cactus pillow pattern
Fabric requirements as outlined in Step 3
Tape Measure or cutting ruler
Rotary blade
Cutting mat
Spray baste or pins to baste with
Pellon Peltex 71F or 72F (this will provide stiff sides to hold up your machine cover and help it keep shape)
Sewing Machine
Important Terms to Know:
RST: Right sides together
WOF: Width of fabric assumed to be 42” wide
1. Correctly determining the size of your sewing machine
It is important to correctly measure your sewing machine to ensure a perfect fit for your cover. We are going to use my machine and measurements for this tutorial, but you can easily do this for any machine!
We will want the widest points in both width, height and depth. If you are storing your machine plugged in, make sure to compensate for the added length from the plug in. I store mine unplugged.
Width: I measured the width from the end of the sewing bed to the edge of the handwheel, I got 18 inches.
Height: I measured from the base/table top to the top of the spool pin. My machine is 12 inches tall.
Depth: I measured at the base due to the depth being the deepest at this point. I have 7.5 inches.
Our final measurements are:
18" wide x 12" high x 7.5" depth

2. Determining size of the panels
For this project I already had the Cosmic Cactus pillow pattern in mind. If you are looking at using another block, make sure it fits within the width of your Panel A. For optimal fit, I would also suggest that it fits within the height of your machine.
We will be using the gathered measurements from above to determine the size of our panels, with a diagram below showing the size of the panels we have calculated for this size sewing machine cover. You will need to make adjustments if you have a different size sewing machine, but this will give you a starting point to work out your custom size panels and then calculate your fabric requirements.
Panel A: Take your measurements for the front, top and back.
The formula:
Take the height of the panel, times it by 2, then add the depth. Then add a 0.5 inch for each 0.25 inch seam on both ends.
Take the width of the panel, then add 0.5 inch for each 0.25 inch seam on both ends.
For example:
Length of my panel: 12" x 2 = 24" + 7.5" equals 31.5". Add 0.5 inch for a total of 32".
Width of my panel: 19" + 0.5 inch for a total of 19.5".
Panel B: Take your measurements for the sides of the cover.
The formula:
Take the length of the panel, then add 0.25 inch for seam allowance at top.
Take the width of the panel, then add 0.5 inch for the seam on both ends.
For example:
Length of my panel is 12" plus 0.25 inch, equals 12.25".
Width of my panel 7.5" plus 0.5 inch, equals 8".
Final Panel Sizes:
• 1 x Panel A: 32" wide x 19.5" high
• 2 x Panel B: 8" wide x 12.25" high

3. Calculate Your fabric requirements.

Make the Cosmic Cactus pillow block without the outlined sashing, using the adjusted fabric requirements provided here (that excludes the fabric required for the sashing).
Create a custom sashing for the Cosmic Cactus pillow block.
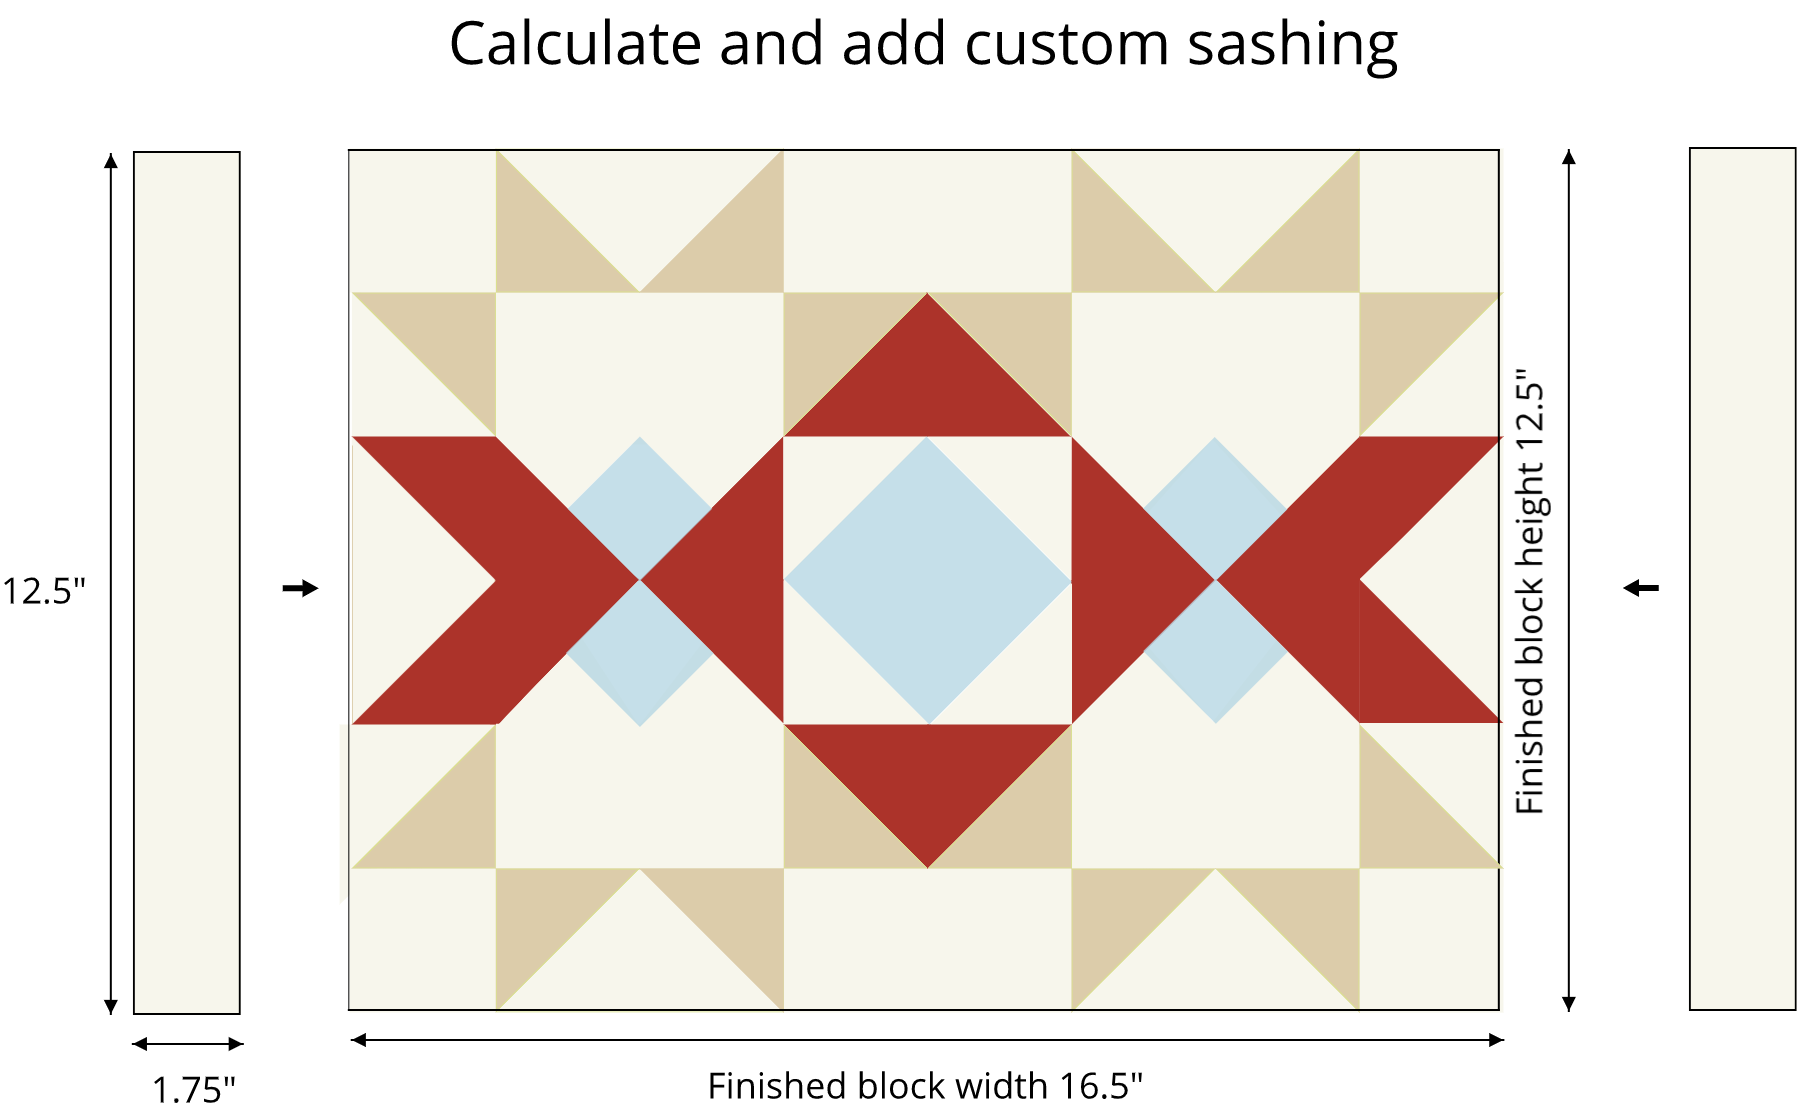
Using the width of Panel A that you previously calculated in Step 2 (in this case 19.5"), calculate a custom sashing.
For example:
Take your desired Panel A size 19.5", minus the finished width of the Cosmic Cactus pillow block 16.5".
This leaves you with 3".
Then divide by 2, giving you 1.5" and add 0.25" for seam allowance, making each sashing panel 1.75" wide.
Use the height of the finished pillow block 12.5" to make a sashing 12.5" x 1.75".
Background fabric requirements.
Panel A:
To complete Panel A, you will need to add a piece of the background fabric to the Cosmic Cactus pillow block (as shown in Assembling the Panels).
Take the panel height, minus the height of the Cosmic Cactus pillow block 12.5", equals 19.5".
Then add a 0.5 inch for each 0.25 inch seam on both ends, giving you 20”.
Cut 1 - 19.5" x 20" rectangle.
Panel B:
Refer to your Panel B block size and Cut 2 - 12.25" x 8" rectangles.
Lining: Is the same size as your Panel A block. e.g. Cut 1 - 19.5" x 20" rectangle
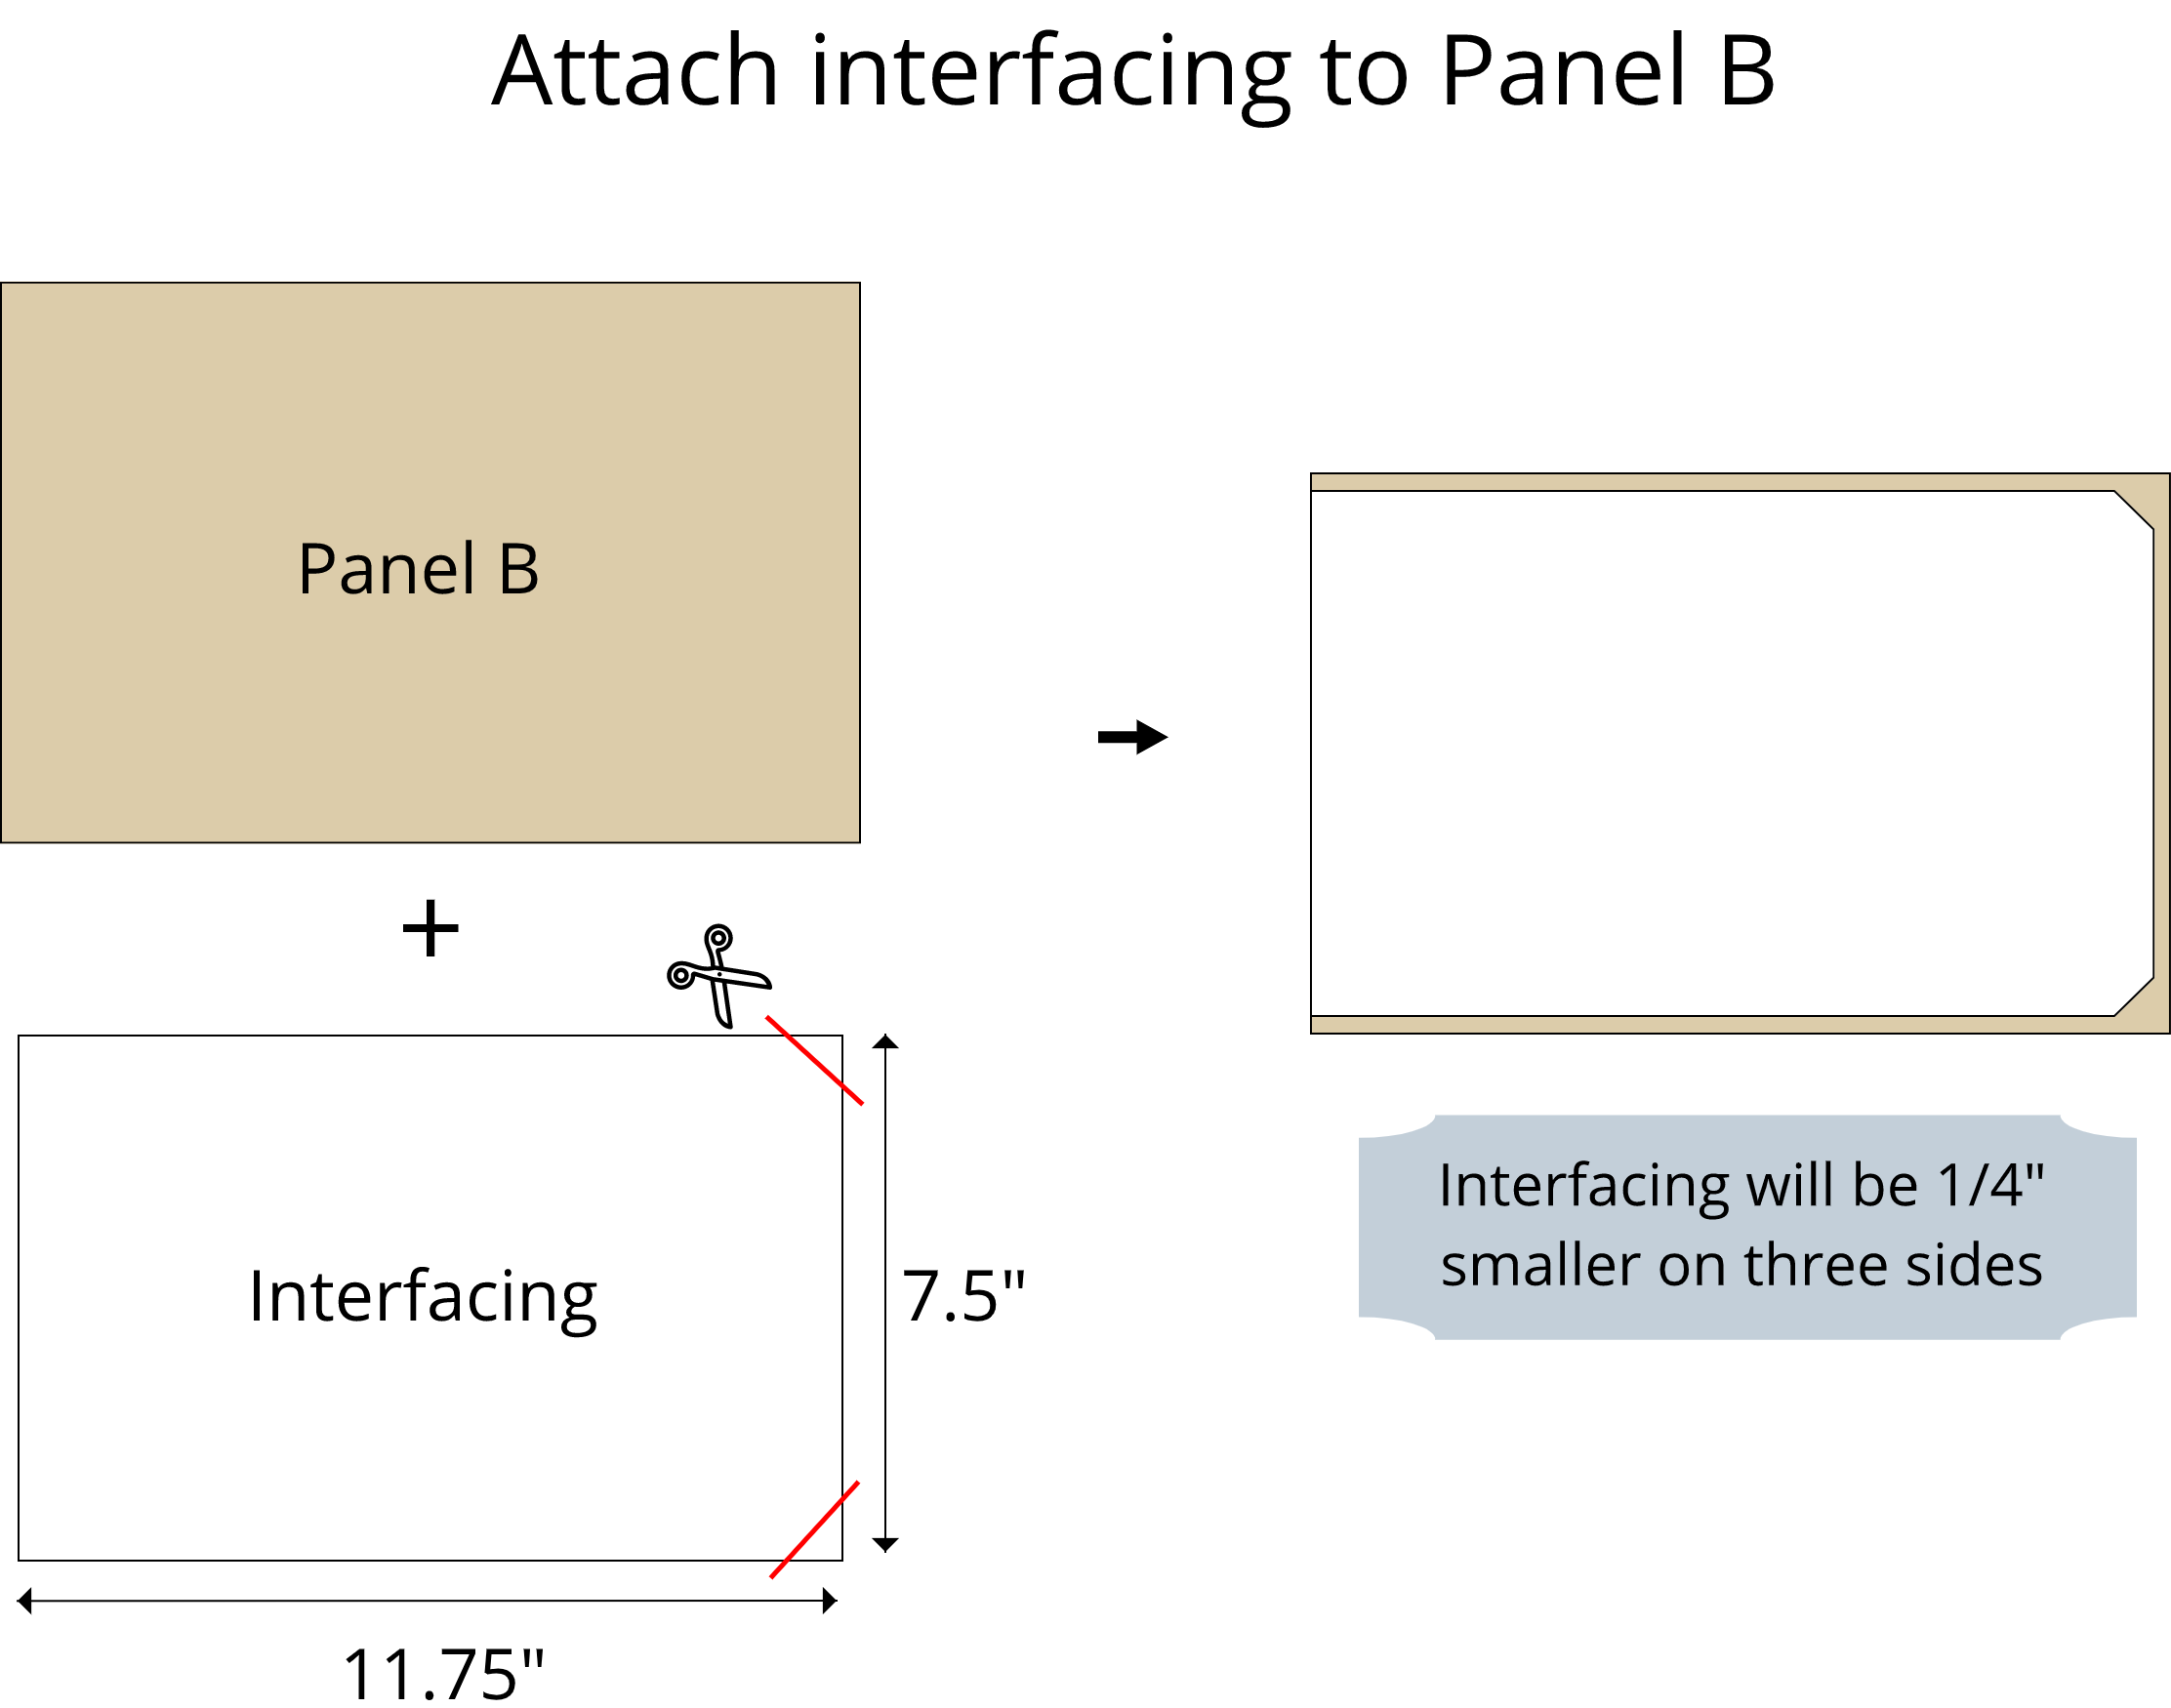
Interfacing: Cut 2 the same size as your Panel B, less 0.25 inch on three sides.
Binding: Cut 2 - 2.5" WOF strips.
4. Assembling the Panels.
Panel A:
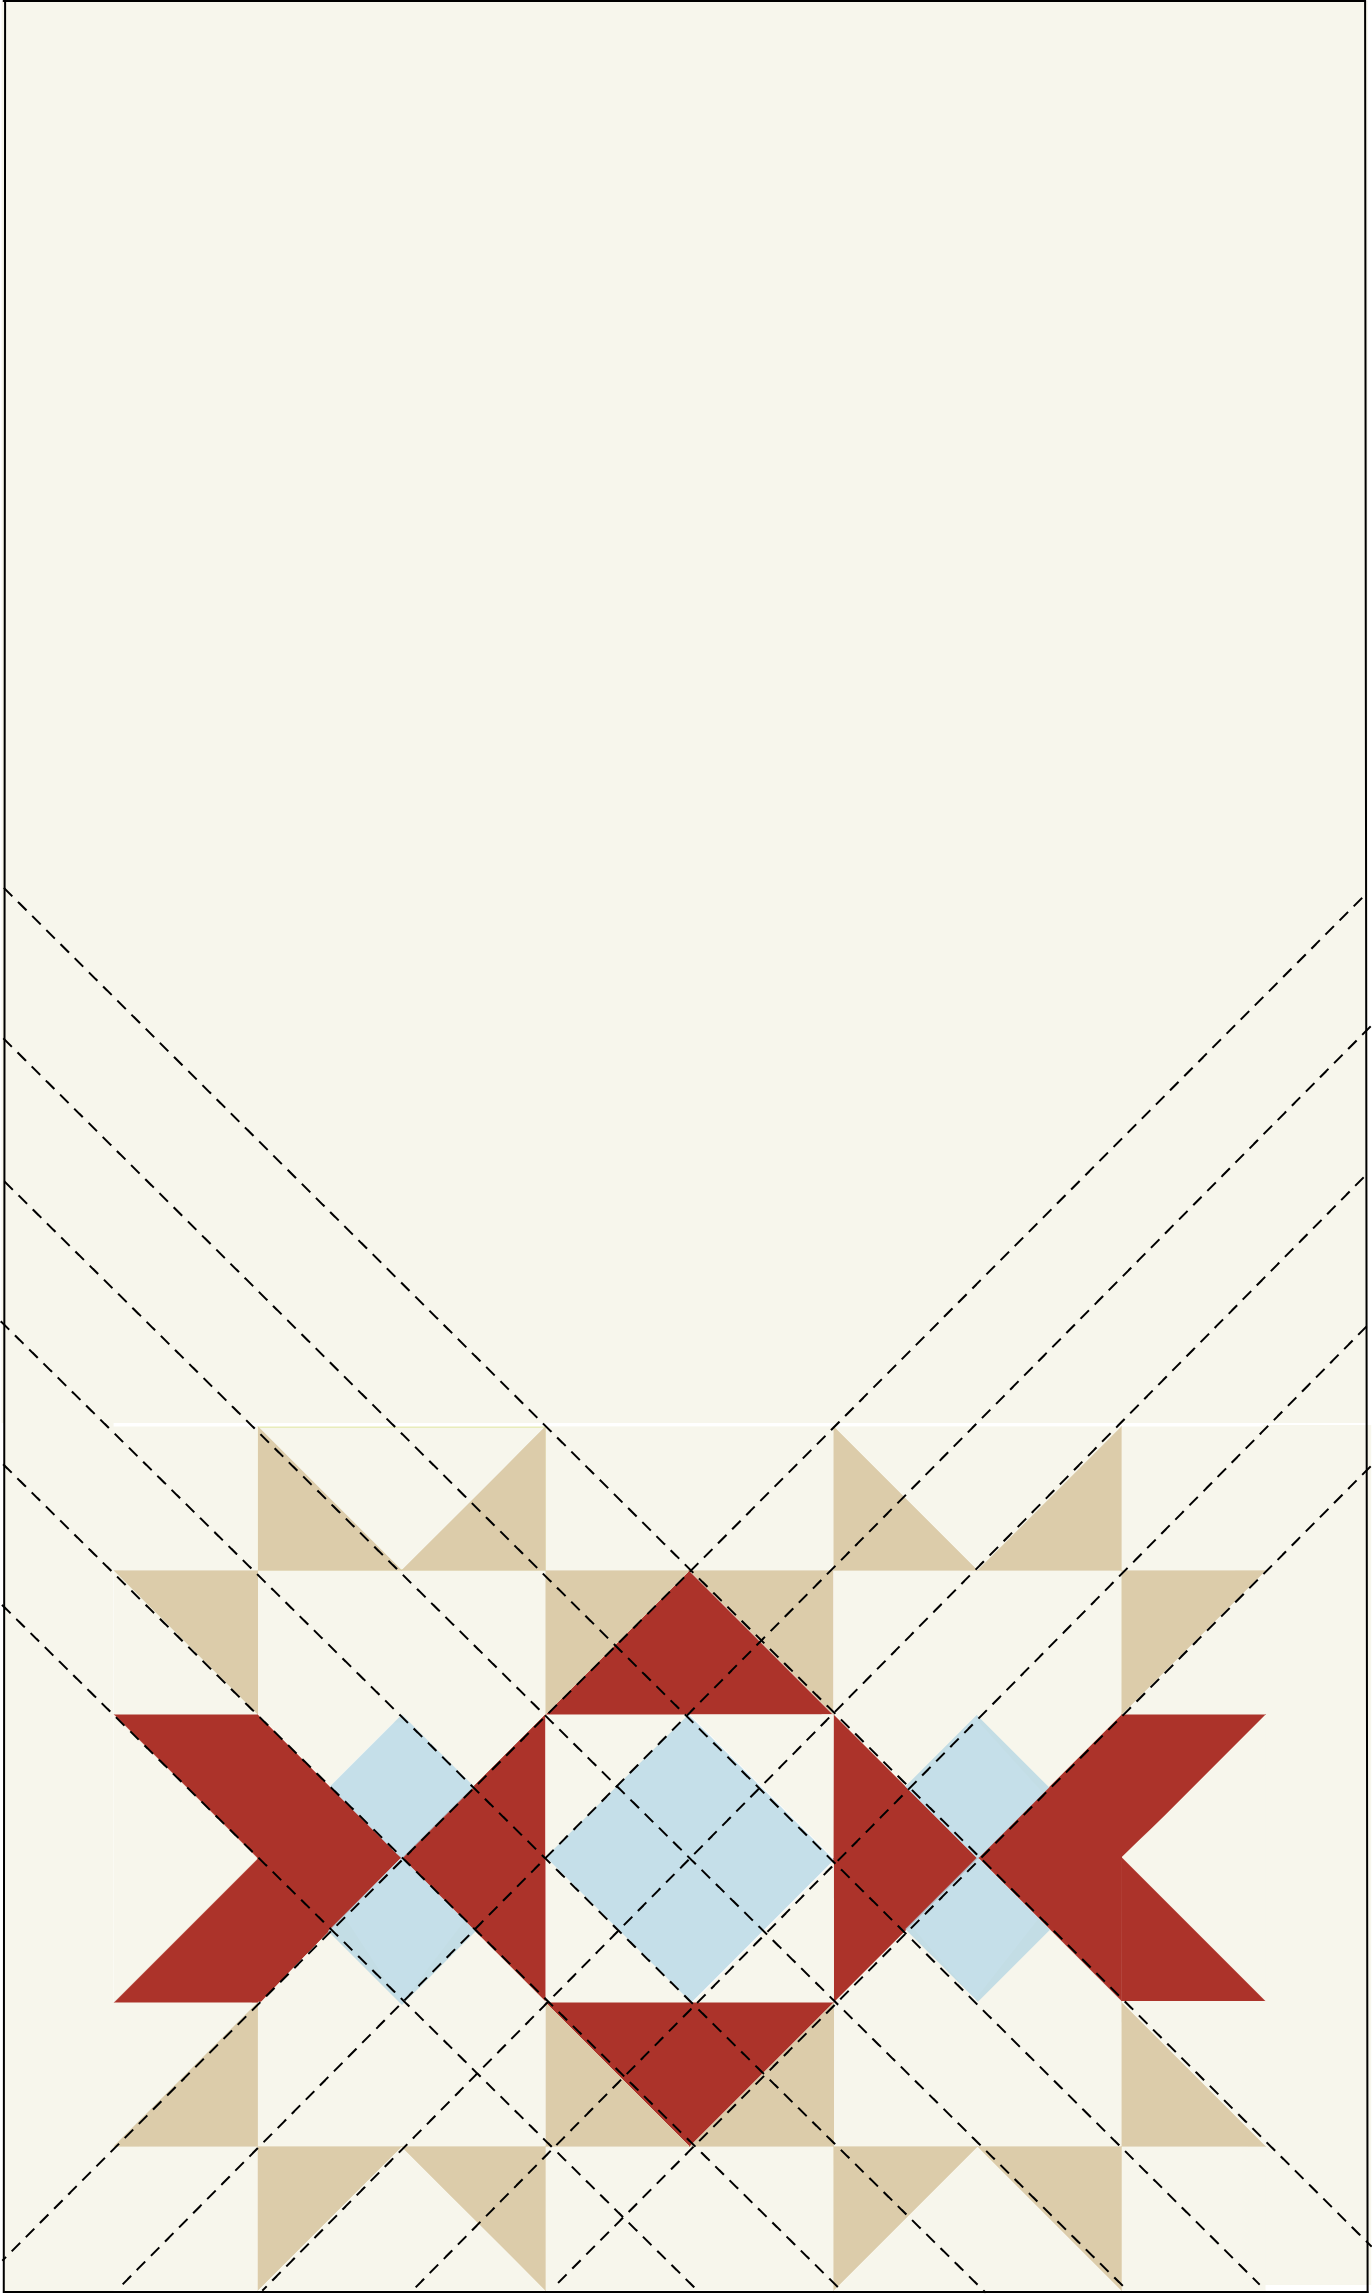
Attach the Cosmic Cactus pillow block to your background fabric to complete Panel A:
Cut background fabric rectangle 19.5” x 20”.
Attach background fabric rectangle to the Cosmic Cactus block as shown below.

Panel B:
Line up with interfacing with bottom of the fabric that has been cut out, with 0.25 inch seam allowance on all three sides.
Cut corners of the top side of the interfacing.
Follow instructions to attach interfacing to fabric.
Make the interfacing more secure by quilting the panels.
5. Quilting the panels

Make a quilt sandwich. Place the backing wrong side up, followed by the batting and Panel A right side up.
Pin or spray baste, then quilt as desired.
Trim any loose threads and square up if needed.
6. Assembling the cover.
STEP 1.
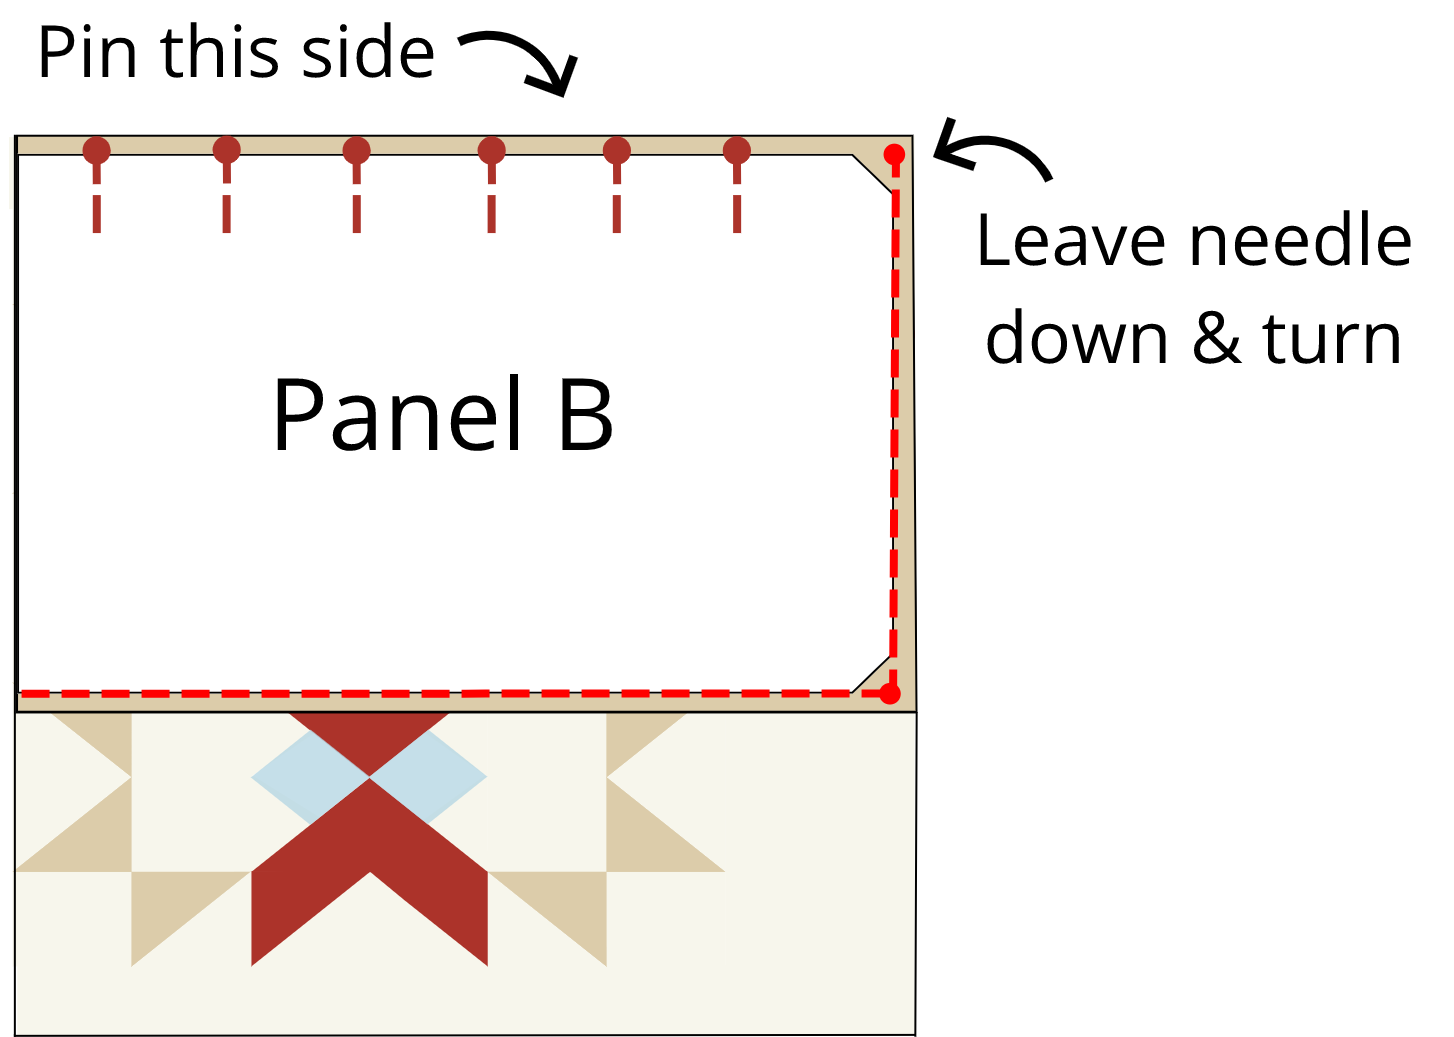
Line up Panel B to the top right corner of Panel A with RST.
Pin the top edge only.
You will be sewing the top edge only, noting you will pin the remainder sides as you go. This makes it easier to line up and there will be less bulk on the first corner.

STEP 2:
To sew, align the needle with the very edge of the interfacing and sew a ¼” seam.
When you come to the corner, leave the needle down and turn lining up panel A to the edge of Panel B. Refer to the video tutorial below to see how this is done.
Then pin that side, sew and continue to next corner.

Video tutorial showing what you do when you come to a corner.
STEP 3:
Next turn, pin and sew the final edge.
Finish and lock seam in by back stitching.
STEP 4:
For the second panel you will start with Panel B lined up to the front side of the Panel A (as shown in Step 1).
Complete Panel B using the same process as outlined in Steps 2-3.
Cover will be inside out once done with this step.

5. Finishing off the cover
Bind the bottom edge of the cover as you a quilt:
To make your binding, place two binding 2.5 inch strips RST and perpendicular to each other, draw a 45-degree diagonal line and sew on the marked line. Fig. 1
Trim seam allowance to ¼” and press seam open. Fig. 2
Repeat until all binding strips have been joined. Fig. 3

Join your binding strips.
Press entire binding strip in half, matching the edges together so the wrong side is contained within the strip.
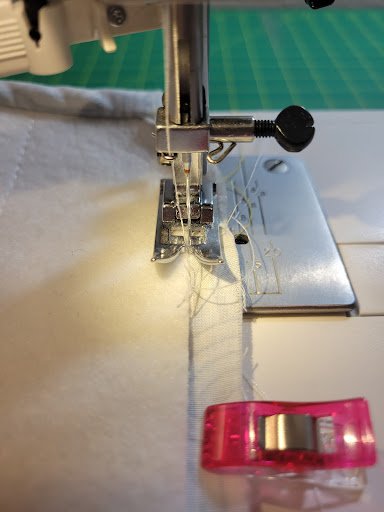
Attaching the binding: With the cover still inside out, pin the raw edge of the binding to the raw edge of the cover.
Sew binding to cover with a 1/4 inch seam.
Flip over the binding and pin to front, attach binding with the needle as close to the creased edge of the binding as you are comfortable.
Appreciate your work and newly created custom sewing machine cover!
Share you finished sewing machine @loulouandbetty and @prairieflowerstitchery using the hashtag #cosmiccactuscover

Did you know you can also use the Cosmic Cactus pillow block to make a quilted jacket?
Find out more in the blog tutorial here.
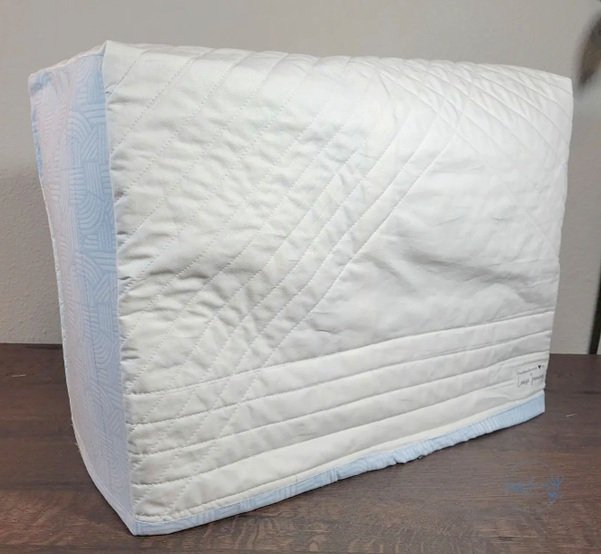
Sewing machine cover using the Cosmic Cactus pillow block made by Louise Jennings @prairieflowerstitchery