
Make FLYING GEESE Four-at-a-time
I’ll be covering how to make Flying Geese four-at-a-time using a modified equation, with extra for trimming to achieve perfect geese every time!
Step by Step Instructions with plenty of pictures, take you through the process.
A Trimming Guide is provided to show you how to use a regular ruler to trim your geese to the exact size.

Learn how to make flying geese 4-in-1.
Flying Geese are a remarkably simple block that consist of a middle triangle which represents the ‘flying goose’ with two smaller triangles which represent the ‘sky’ around it.
These blocks are common in modern quilts and are one of the essential quilting blocks you should master as a quilter. Once you discover how easy they are, you’ll be hooked!
Methods for making Flying Geese include the Traditional, Stitch and Flip (both making one at a time) and the four-at-a-time (traditional - which doesn’t include any extra for trimming).
Try the Four-At-A-Time modified method and enjoy these benefits:
Achieve perfect flying geese every time!
There is very little wastage (only a very little will be trimmed off to get your geese to the exact size).
It saves you time - you can sew four at a time!
No special quilt tools required! Use what you already have, including a regular quilting ruler.
This method has been thoroughly tested and doesn’t give you the dog ears (or flaps) of fabric that occur in other methods I’ve tried. If the maths isn’t right, you find these dog ears showing at the top of the geese for everyone to see!
Grab a PDF copy of the Flying Geese Guide! This handy reference guide is FREE for you to download and print! I’ve done the maths for you! Create custom sizes using the included formula.

Here’s what you’ll need:
FREE Flying Geese Guide
Fabric - Two fat quarters or large scraps
Rotary cutter
Fabric marker
Cutting mat
Ruler
Pins
Iron
Instructions for Making Flying Geese - Four-at-a-Time.
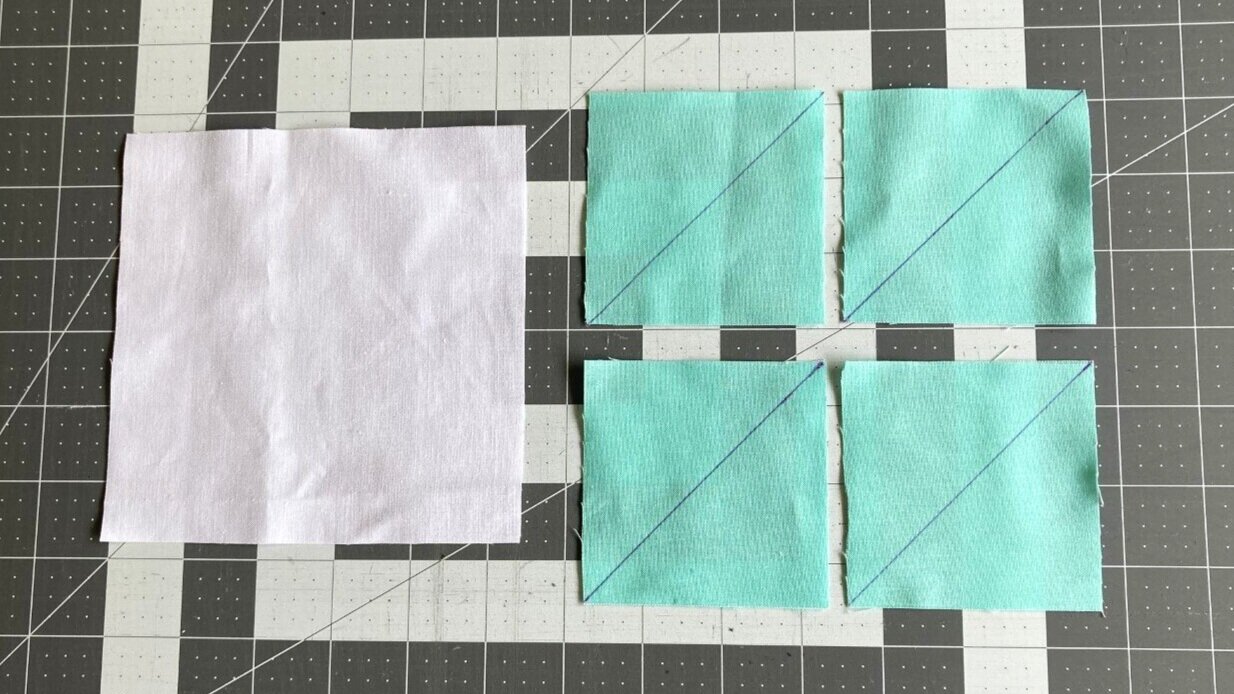
Cut your squares. Draw a diagonal line through each of the small squares on the wrong side.
1. Cut 1 large square and 4 smaller squares.
2. Draw a diagonal line through each of the four small squares on the wrong side of the fabric.

Take the large square. Place two small squares in opposite corners, matching diagonal lines in the centre. Pin.
3. With RST (right sides together), place two small squares in opposite corners of a large square, matching the overlapping diagonal line.
Pin to hold in place.
TIP: The key to success is with overlap. Too much overlap and you will likely have dog ears (or flaps) showing on the right side. Take the small squares to very edge of the large square and don’t overlap too much.

Sew a ¼” on either side of the drawn diagonal line.
4. Attach a ¼” sewing foot and sew a ¼” on either side of the line marked on your fabric.
As we’re not aligning on the raw fabric edge, watch the foot to ensure you are keeping straight.
TIP: Ensure you are sewing an accurate ¼” to avoid dog ears (or flaps) showing on the right side of your finished geese.

Cut along the diagonal line between the two rows of stitching. Press seams open.
5. With a rotary cutter and ruler, cut along the diagonal line between the two rows of stitching.
Press your seam open (to avoid too much bulk in the centre seam).

Place the remaining squares with the diagonal line going directly through the centre of the two smaller triangles. Pin in place.
6. With RST place the remaining squares with the diagonal line going directly through the centre of the two smaller triangles.
The drawn guideline should run perpendicular to the seam we already stitched.
Pin to hold in place.
TIP: To avoid dog ears (or flaps) showing on the right side of your geese, ensure the drawn line goes through the very centre of the two smaller triangles.

Sew ¼” on either side of the marked line.
7. With the remaining two sections, sew ¼” on either side of the marked line.
TIP: Sewing anything less than a ¼” will likely cause dog ears (or flaps) showing on the right side.

Cut along the diagonal line between the two rows of stitching. Press seams open.
8. With a rotary cutter and ruler, cut along the diagonal line between the two rows of stitching.
Press seams open.
Trimming Instructions:
The best part about this method is you trim the flying geese to exact size!

Refer to the Flying Geese PDF for making flying geese 4-in-1.
1. Refer to my FREE Flying Geese Guide and trim your geese to the unfinished size.
For example: If your geese need to be 2” x 4” finished size, you need to trim the geese to 2½” x 4½” unfinished size.

Align your diagonal flying geese seam with the 45° line.
2. Place your flying geese on your cutting mat with the point facing towards you.
3. Take a ruler with a 45° line and place it on top of your flying geese. Align your diagonal seam with the 45° line. The other geese corner should line up with your unfinished width. In this case 4½”.

Trimming Geese - Line up your ruler with the centre geese point.
4. Divide the long side by two to find the centre of your geese.
For example: Unfinished flying geese is 2½” x 4½” in size . Divide 4½” by 2 = 2¼” (centre of your geese).
5. Using the ‘centre geese’ number calculated in the previous step, line up the your ruler markings with the tip of the geese. In my example this is 2¼”.
Ensure there is a ¼” above your flying geese triangle to the edge of the fabric.
TIP: You can make adjustments here if you’re a little short on one side.

Double check before you cut!
6. Double check before you cut! Check all the points in red are correctly aligned. Ensure the flying geese extend past your unfinished measurement (or perfectly aligns with it).
In this instance, this will be 2½” x 4½”.
Once everything is aligned correctly, trim around the right and tops sides of your ruler.

Turn your geese around 180°, line up your ruler and trim the other sides.
7. Turn your geese around 180°. Using the unfinished size of your flying geese (in this case 2½” x 4½”), line up your ruler using your trimmed sides as your guide.
Ensure your centre point is matched and you have ¼” above your geese tip to the edge of the block.
Once everything is aligned correctly, trim around the right and tops sides of your ruler.
Congratulations! You have now successfully completed four flying geese!

You have now successfully completed four Flying Geese!
Don’t forget to grab a PDF copy of the Flying Geese Guide!
This handy reference guide is FREE for you to download and print.