
Make a Cosmic Cactus Jacket - Part 3: Making your jacket

This three-part series is about how you can make a Cosmic Cactus quilted jacket. But you can also apply the method outlined to make any quilted jacket.
To make the Cosmic Cactus jacket, you will need to purchase the Cosmic Cactus pillow pattern.
Now this is where the fun begins and you can finally see your jacket come together!
Get your rotary cutters and sewing machines ready, it’s time to make your jacket!
This week we will be covering:
Part 3 - Making Your Jacket:
• Looking for Part 1: Getting Started

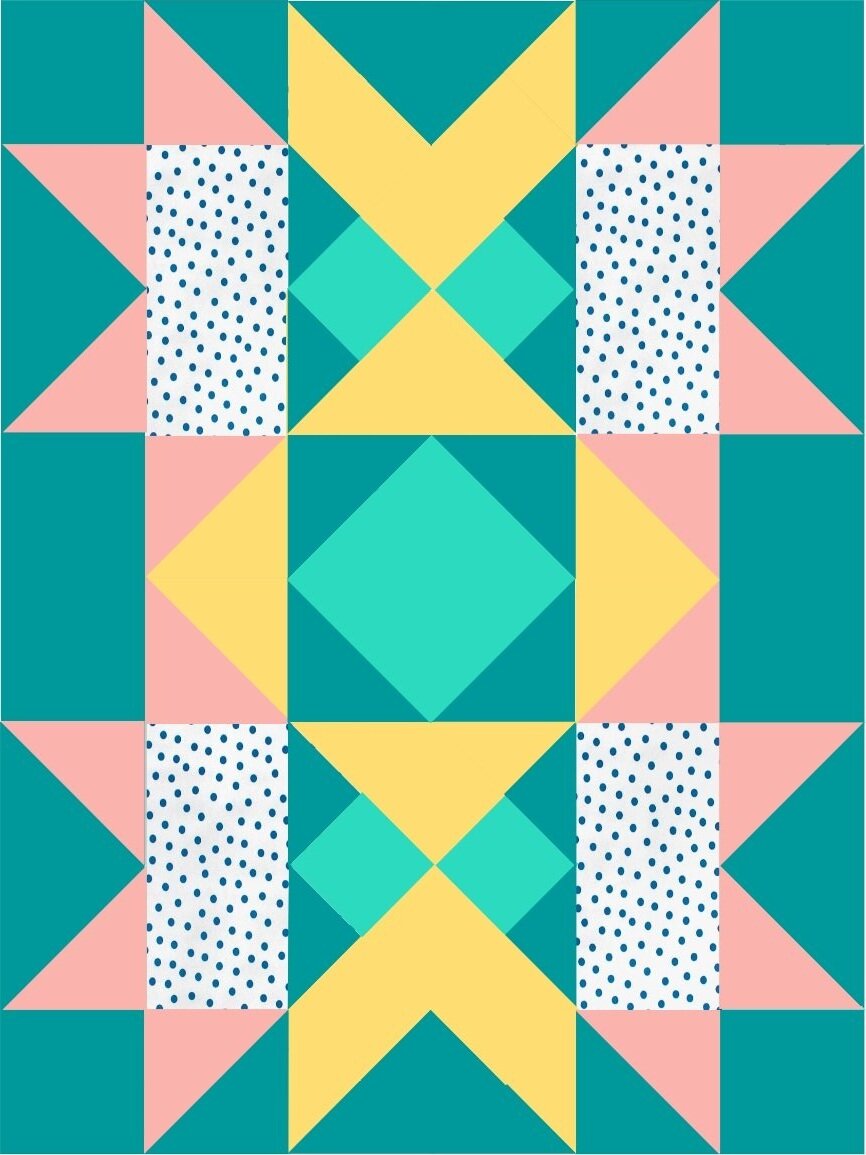
Cosmic Cactus jacket by Josephine Accardo @hafajojo
What you should know:
This is a general guide which explains the process, provides some inspiration and information for you to start the process of making your own Cosmic Cactus jacket.
The method outlined is for making and adding a panel for the jacket back and adding additional quilt blocks to the jacket for the pockets and sleeves.
There is an assumption you understand basic quilting terms and methods such as piecing, quilt sandwich and binding.
The finished size of Cosmic Cactus pillow block you will be making for this jacket will be 12½” x 16½”.
The Cosmic Cactus block will fill the back of a toddle size jacket (as pictured above). For an adult size jacket, the block will not fill the back of the jacket. This is not a problem, as you can make a custom sashing (outlined later on) to go around the block.
I would suggest this project is not suitable for longer style jackets and coats due to the size of the Cosmic Cactus block. Upscaling the block is an option for those more experienced or adventurous!
Before you start, if you are going do a test run of your jacket pattern, now is the time to do it! Testing the pattern allows you to make any adjustments to the pattern before making the final jacket.
1. Make the Cosmic Cactus block.
Follow the instructions for cutting your fabric using the Cosmic Cactus pillow, except do not cut the sashing as directed in the pillow pattern. The Fabric A sashing is indicated with an asterisk*.
You will cut a custom size sashing, as previously calculated in Part 2.
Follow the pillow instructions for piecing and assembling the block, excluding the sashing.
Once your block is made, refer to the diagram below for adding your custom sashing.
Sashing TIP: For a smaller size jacket, when cutting the fabric for the pattern pieces make sure the key elements of the block are not cut out. In this case Josephine had to add sashing to three sides so that she did not lose any of the block in seams or with binding.
Add your custom sashing:


2. Prepare your Quilt Sandwich.
Don’t go cutting out your jacket pattern pieces yet!
Instead, you will be cutting in preparation for quilting.
You will need to cut a generous amount of fabric around your jacket pattern pieces and also cut fabric for the lining, which will become the back of your quilt sandwich.
Also cut fabric if your jacket includes a collar, hood or pockets.
TIP: Take care of pattern placement if using directional fabrics as some fussy cutting may be required.

Jacket back ready for quilting.
Jacket Outer - Cutting in preparation for quilting.


Jacket Lining - Cutting in preparation for quilting.


Now it’s time to put together your quilt sandwich!
For all jacket pattern pieces that you are quilting, prepare a quilt sandwich using low loft batting or flannel.
For the pocket quilt sandwich, use interfacing or flannel only. This will create a less bulky pocket and provide more support.
Josephine elected to use old flannel sheets for batting as they have more body and not as heavy for a coat.
Make your quilt sandwich:
Place jacket lining with right side down.
Next, place low loft batting or fleece on top of the lining.
Lastly, place jacket outer on top with right side up.

Example: Shows making a quilt sandwich for the jacket back.
Jacket Outer

Right side up.
+
Batting

+
Jacket Lining

Right side down.
3. Quilting your jacket pieces.
All your pattern pieces need to be quilted individually before you sew the jacket together.
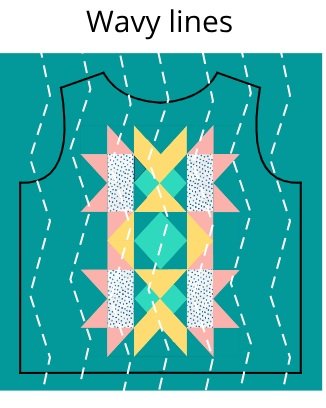
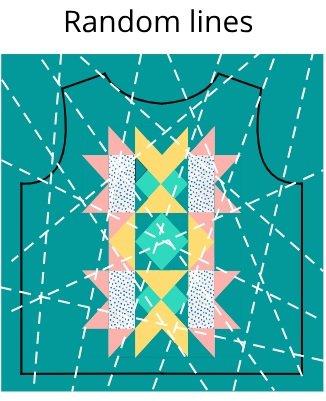
There are two types of quilting you can consider:
Walking foot quilting: (or even feed foot) is a speciality sewing machine foot that includes an extra set of feed dogs that ‘walk’ allowing the top and bottom fabrics to feed evenly through the sewing machine. If you’ve never done walking foot quilting, a great introduction to walking foot quilt is a book WALK: Master Machine Quilting with your Walking Foot by Jacquie Gering.
Free motion quilting: If you are more experienced and have a free motion foot for your domestic machine or have a longarm machine you can be creative and show off your free motion quilting skills.
Josephine suggests this is where you can have fun with the quilting! If you are a novice quilter, take the opportunity to practice patterns that you may be more hesitant to do on a full-size quilt. Garments are a good way to build those free motion quilting skills.

Josephine opted for some wavy quilting lines.

Simple walking foot quilting options.


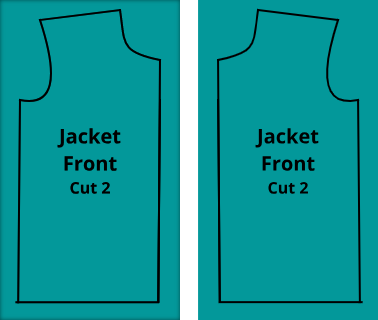
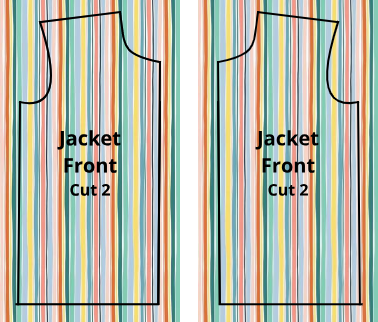
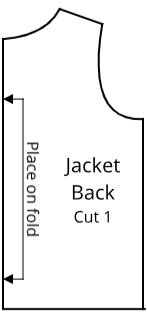
4. Cut out your pattern pieces.
Follow the pattern directions and cut out all jacket pattern pieces.
Be mindful when cutting your pattern pieces:
Check the centre back Cosmic Cactus panel is centred as you would like it.
Line up and check your pockets, sleeves or any other quilty elements you have added are where you want them.
Do you need to match any quilting lines? If you planned your quilting so your quilting lines could be matched when sewing the garment together.
5. Add your pockets.

Before sewing the jacket together, you need to add your pockets!
Tip: If you pockets requires buttonholes, sew them BEFORE you sew the pocket on the jacket.
Bind the top edge of your pockets.
Fold over a 1/4”, position your pockets where you would like them on the jacket, pin and then sew around the three edges.
Tip: If you do find your pocket sags, Josephine suggests you can either add Velcro or snaps to hold in place, or even add a fancy button (as you are already doing buttonholes anyway for the jacket).
6. Sewing your jacket.
Follow the pattern instructions for attaching the pieces together.
The instructions for hemming, interfacing and clipping will not apply for making the quilted jacket.
Sew a 5/8” (1.5cm) seam as outlined in your jacket pattern
Tip for sewing:
Josephine suggests you sew in the sleeves before the side seams are sewn, particularly for a child size jacket, as the jacket is small and can be difficult to manoeuvre on the sewing machine. By sewing the sleeves on and then sewing the sleeve and sides together you can line up the seams with ease.

7. Finishing your jacket.
Once you have finished sewing the jacket pieces together, it’s now time to finish off your jacket with binding, button etc.
We will be covering:
The two types of binding your jacket may require.
Adding buttons and sewing button holes.
If you don’t like sewing button holes, try snaps instead!
Josephine has elected to bind the jacket edge with a contrasting pink to match the sleeve cuffs.

Binding:
Before binding, check the lengths match in sleeves and front to back, and also that hems are straight and even all the way around. More about binding is also outlined in Part 2.
Remember there are two types of binding required to finish your jacket:
Binding for all outer edges of your jacket. This binding is completed as you would for your quilts. Binding is required for the neck, sleeve, front and bottom edges. Use the custom binding you have made.
Double fold bias binding - make or purchase a bias binding for the inner jacket seams. Simply finish one edge with bias tape and fold over the edge. Cut down ¼” the other edge of the seam and then pull over the edge with the bias tape and sew down. Presto reversible! Just be mindful of your pocket placement and snaps if you decide to do this!
Buttons:
You can make buttons a feature on your jacket.
Find some cool buttons or DIY some fabric buttons to match your jacket.
Josephine has used a pop of yellow buttons on this double-breasted design was just the thing to tone down the pink and bring out the yellow – and who doesn’t like yellow on teal? Your child will be the talk of the playground with a one-of-a-kind quilted jacket!

Your jacket is finished!
Enjoy the satisfactions of having completed an amazing one-of-a-kind piece of wearable art!
After a few washes it will have that cozy crinkly look we love in our quilts.
Josephine suggests: When you see a quilt pattern challenge yourself and see what elements of that pattern you can use to make a jacket. There are lots of coat patterns available that can be adapted to a quilted jacket for both kids and adults.
Get your copy of the Cosmic Cactus Pillow pattern.
Share your completed Cosmic Cactus quilted jacket #CosmicCactusJacket
Did you know you can also use the Cosmic Cactus pillow block to make a sewing machine cover?
Find out more in the blog tutorial here.


Toddler girl jacket by Josephine Accardo @hafajojo