
Make a Cosmic Cactus Jacket - Part 2: Fabric Requirements

Toddler girl jacket by Josephine Accardo @hafajojo
This three-part series is about how you can make a Cosmic Cactus quilted jacket. But you can also apply the method outlined to make any quilted jacket.
To make the Cosmic Cactus jacket, you will need to purchase the Cosmic Cactus pillow pattern.
Did you know you can also use the Cosmic Cactus pillow block to make a sewing machine cover?
Find out more in the blog tutorial here.
This week we will be covering:
Part 2: Fabric Requirements:
• Looking for Part One: Getting Started
• Part Three: Making You Jacket
What you should know:
This is a general guide which explains the process, provides some inspiration and information for you to start the process of making your own Cosmic Cactus jacket.
The method outlined is for making and adding a panel for the jacket back and adding additional quilt blocks to the jacket for the pockets and sleeves.
There is an assumption you understand basic quilting terms and methods such as piecing, quilt sandwich and binding.
The finished size of Cosmic Cactus pillow block you will be making for this jacket will be 12½” x 16½”.
The Cosmic Cactus block will fill the back of a toddle size jacket (as pictured above). For an adult size jacket, the block will not fill the back of the jacket. This is not a problem, as you can make a custom sashing (outlined later on) to go around the block.
I would suggest this project is not suitable for longer style jackets and coats due to the size of the Cosmic Cactus block. Upscaling the block is an option for those more experienced or adventurous!

The feature of this jacket is the Cosmic Cactus block on the centre back
1. Choosing your Fabrics
The options are limitless! You get to choose all the fabrics for the block and elements, the main jacket colour and the lining. But with so many options this can be overwhelming!
The jacket made by Josephine has one background fabric and then uses accent fabric for the lining, Cosmic Cactus block, pockets and binding.

Fabric pull for girls quilted jacket.
Our suggestions for choosing fabric:
Select only 5-6 colours.
Choose one main solid colour for the whole jacket. The main colour can also be included in the Cosmic Cactus block.
Choose 4-5 accent colours for the Cosmic Cactus block, pockets and binding.
If using directional fabric take note of orientation change to Cosmic Cactus pattern (landscape to portrait).
Check out the Cosmic Cactus Pillow Colour Inspiration Guide or Testers Parade for inspiration.
How to decide:
What are your favourite colours?
Seen a colour palette you really love?
Have a favourite fabric bundle?
What is your style? Minimalist, modern, traditional etc.
There is plenty of inspiration out there, so take a look around and see what you are drawn to.
Pre-wash all fabrics. I typically don’t pre-wash fabrics when I use them to make quilts. But for a garment you don’t want the fabric to shrink after you’ve made it and feel too small.
2. How much fabric will you need.
It’s hard to calculate the exact amount you will require, but you can use the jacket pattern and Cosmic Cactus Pillow pattern as your starting point.
Tip: I would be generous in calculating your fabric yardage to ensure you have enough.
Read on and use this guide to help you calculate your jacket fabric and material requirements.
In summary your fabric and material requirements for your jacket will be:
(1) Cosmic Cactus block (without sashing as you will calculate and make your own custom sashing).
(2) Sashing around Cosmic Cactus block.
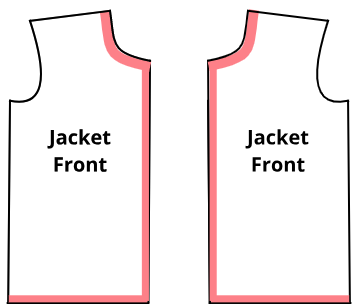
(3) Outer jacket fabric - including jacket front, sleeves, a collar or hood (if your jacket pattern includes these) and any extra that appears in your pockets.
(4) Accent colour for lining.
Other accent fabrics to make:
(5) Pockets.
(6) Sleeve cuffs or other quilty elements.
(7) Binding to finish off all edges of your jacket.
(8) Batting or flannel.
Continue reading for further details!
1. Cosmic Cactus block

Cosmic Cactus block. Colourway for jacket by Josephine.

Fabric requirements for Cosmic Cactus Pillow without sashing.
Refer to the Cosmic Cactus pillow pattern for fabric requirements, referring to Fabric A-D only, but do note the adjustment to the block fabric requirements, which excludes the pillow sashing (as outlined below).
The adjusted fabric requirements do not include the sashing, as you will make your own custom sashing (as outlined next under (2) Sashing fabric requirements).
Don’t cut the Fabric A rectangles marked with an asterisk* (which are the sashing requirements for the pillow).
2. Sashing.
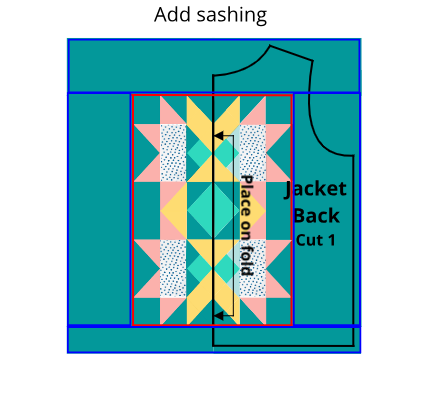
Diagram showing custom sashing requirements.
You will need to calculate and make a custom sashing to go around the Cosmic Cactus block.
Depending on the size of the jacket you are making, you will need to include a sashing on at least three sides to make the back of the jacket.
How to calculate your fabric requirements and make your custom sashing:
Find the centre point of your Cosmic Cactus block which is outlined in red.
Then place your pattern piece on top, placing the pattern piece on the centre line of your block (as most jacket pieces are cut on the fold).
Anything outside the red rectangle becomes your sashing. The sashing panels are indicated by the blue rectangles. Your sashing size might be different for the top and bottom. Write down the size of your custom sashing block.
Tip: If you are including blocks for any of the other pattern pieces such as the sleeves, please follow the same method.
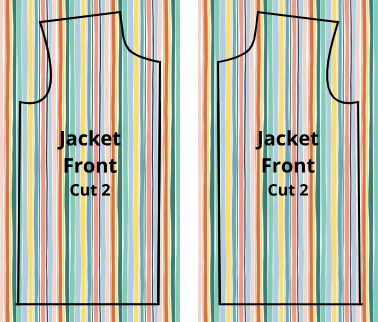
3. Outer Jacket.
Select the main colour for you jacket.
Refer to your pattern for fabric requirements and take a look at the fabric layout guide.
As you need to include extra fabric around each pattern piece (as shown in the below diagram), the fabric layout guide in the pattern may not include enough around the pattern pieces you need to cut. You will need to include additional fabric to cater for the extra fabric you need.
If your jacket includes a collar or hood, then you need to include extra fabric for them.
Please note: The back panel will include the Cosmic Cactus block and you have already calculated the fabric requirements for the sashing, so you will not need any further fabric for your jacket back.
It’s very important that your fabrics pieces are cut larger than your pattern piece as you will have some shrinkage with quilting.


Cut a generous amount around your pattern pieces. You will make a quilt sandwich, quilt and then finally cut out your pattern pieces for sewing the jacket together.
4. Jacket Lining.
4. Jacket lining fabric requirements.
If your jacket pattern is asking for an interfacing or lining, please note these are not required for a quilted jacket as outlined here.
You will need the same amount of fabric as the jacket outer, so cut the same size pieces. Use your jacket pattern pieces to cut a lining as shown below.
The jacket lining fabric will essentially become the backing fabric in your quilt sandwich and the lining of your finished quilted jacket.
Prefer a regular garment lining? Another option is to quilt only the two layers (i.e. the jacket outer and your batting or flannel) and then cut and add the lining as you would a regular garment, following the directions outlined in your pattern. This will hide all the seams and gives you the option not bind the edges.


The lining of your jacket is essentially the backing fabric for your quilt sandwich. Cut a generous amount around your pattern pieces for the lining too.
5. Pockets.
If adding feature blocks for the pockets and sleeves you will need additional fabric to complete these.
Instead of using batting, we recommend using the fleece or interfacing to make for a less bulky finished pocket. This will make it easier to sew onto the jacket front later on.
Interfacing will add more structure so it will not sag.
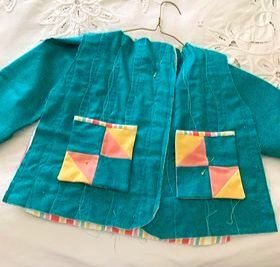
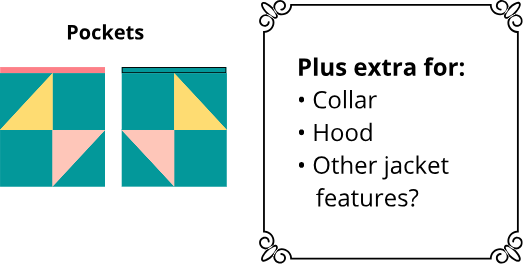
For this jacket Josephine played with a few elements that I designed and settled on the square pocket design. Feel free to use the square pocket design (as outlined below).
Or release your creative energy to make your own custom design elements. You can take elements from the Cosmic Cactus pillow block and adapt these elements for your pockets or sleeves.
Square Pockets:
I have designed a simple square pocket with elements found in the Cosmic Cactus pillow bock.
You can read more about Make A Square Pocket here.
Download PDF instructions for cutting and making the square pockets from our Resource Library.
A simple change in your fabric selections can change the look for this square pocket design.

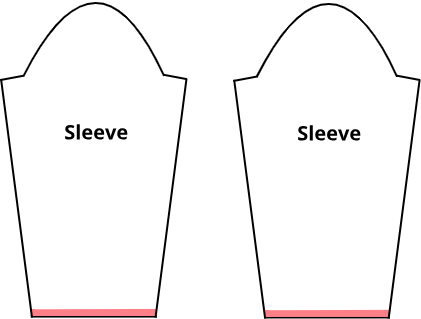
6. Sleeves.
There are a number of options for the sleeve of your jacket. Whatever you choose to do, factor in the additional fabric you will require.
Choose simply to finish with binding or a cuff.
Add chevron or another design near the bottom edge of the sleeve. Simply create a row or block to include in the sleeve and add sashing to the top and bottom of this row, taking into consideration the placement of the chevron row.
You can use the same guidelines at (2) Sashing fabric requirements for calculating and adding a sashing for the sleeves and any other quilty elements you decide to add.
Be creative and use other elements from the Cosmic Cactus pillow design in the sleeve. Or create your own sleeve design!
Josephine was debating to do the sleeves plain or put a block on the sleeve. She played with the idea of a rick rack chevron but found it felt too military and opted to leave the sleeve plain and instead added a cuff in one of the block colours.
Other creative ways to add details to your jacket is to use cording, rick rack and embroidery.


Options for sleeves.
7. Binding.
There are two types of binding you will need to finish off your jacket:
Binding for all outer edges of your jacket: This binding is constructed as you would for your quilts i.e. you simply make a binding which has been folded in half. Binding is required for the neck, sleeve, front and bottom edges. Decide if you want to make a matching or contrasting custom fabric binding for your jacket.
Double fold bias binding - If desired, you will also need a binding to finish off and hide your inner seams which makes for a neater finish. You can choose to either make your own custom bias binding or buy some pre-made. Josephine recommends the Clover Bias Tape Maker 3/4” (18mm) if you plan on making your own binding.
To calculate your binding requirements:
Measure all the edges as shown and account for any extra binding for the collar, hood etc if required.
If you are making your own binding, then remember to include extra yardage in your calculations. Just measure the length of all edges that require binding and add a little extra to be sure.
Try a contrasting binding as seen in the toddler size jacket or something plain to match the main colour of the jacket. You can even do a mix of both!
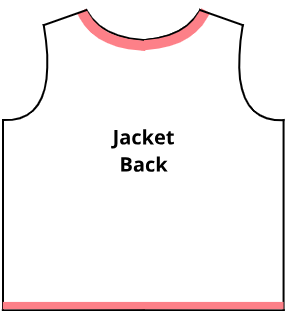
Binding is required for all the jacket edges as outlined in pink. The exception being if you are doing a cuff instead.
7. Flannel or Low Loft Batting.
Flannel:
Most of us make our quilts using batting, but for a quilt coat this may make the coat too heavy and stiff.
For a softer draping jacket and less bulky jacket, Josephine recommends using flannel instead of quilt batting. Old flannel sheets are ideal!
If buying flannel, ensure you wash the flannel fabric before use. Flannel shrinks a lot!
Low loft Batting:
If you prefer a batting, then look for a low loft batting.
Low loft batting is a light weight (or thinner) batting that will drape well for a jacket.
When shopping for a suitable batting, check the batting manufacturers guide and see if they recommend the batting for garments.
If you are looking for a warmer jacket:
Then consider a batting to suit your needs (and your climate).
Just remember a higher loft batting will be thicker and impact the how the jacket feels to wear and its overall drape.
Get your copy of the Cosmic Cactus Pillow pattern.
Next read Part 3: Making your Jacket.