Cosmic Cactus Quilt Along PART 8: Finish your quilt (optional)
Do you need some help, motivation or inspiration for finishing your quilt? We put so much energy into planning and sewing our quilt top, now you need to keep that momentum going.
Don’t end up with a UFO (unfinished object)! Take the next steps with me as we complete our quilts, so our quilts become a finished object for us to enjoy.
Where to start? Start by reading the Finishing Instructions on Page 24 of the pattern.
Looking for the Cosmic Cactus Quilt pattern!
Next read this blog! There are so many different options for finishing your quilt besides what is outlined in the pattern. I will mention some of these for you to consider and explore further if you wish.
Make a plan for finishing your quilt and then enjoy the process of turning your UFO into a finished object!
Click on the links to our Pinterest Boards to explore more options or be inspired!
If you have any further questions or need a little help completing your quilt, please ask our community of quilters by joining our Facebook group.
MAKE YOUR BACKING + CUT BATTING
There are a number of ways you can complete your backing, with three different options outlined below.
Just remember to cut your batting and backing larger than your quilt top as follows:
If you are basting and quilting on your sewing machine, add a couple of inches overhang on all four sides for both the batting and backing.
If you plan to use a longarm quilter, the standard requirement is to add 4 inches overhang on all four sides for both the batting and backing. But if using a new longarm quilter, double check with them first.
Quilt Batting: If you are completing the quilting yourself, you will need to purchase batting. There may seem like an overwhelming range of battings (or called wadding in some countries). If you need some help deciding, take a look at our Batting Pinterest board, with information from some experienced quilters covering the different types of batting (with some including handy downloadable guides to print).
Quilt Backing Options:
Choose one fabric as directed in the pattern: This is a great option if you are short on time!
Cut following the instructions on Page 6 of the quilt pattern and sew the two pieces together.
Don’t want to join two 42-inch-wide fabrics together? Then consider wide backs which are typically 108 inch wide.
Make a scrappy backing! Use leftover fabrics and enjoy being creative with making your backing. This will take a while longer, but allows you to use your leftover fabrics and you can make it into a fun creative project!
Looking for scrappy backing ideas? We’ve put some together in a Pinterest Board.
Make a simple scrappy backing!
Consider alternatives to quilting cotton such as:
Flannel fabric or sheets: Needs to be prewash as has a significant amount of shrinkage + not all flannels are created equal!
Minky: Can be a little trickier to sew with, so check out some tutorials to see if minky will work for you.
Find out more about sewing your backing with flannel or minky, with tutorials found on our Pinterest Board.
MAKE A QUILT SANDWICH + BASTING
Before making your quilt sandwich, give the quilt top a final press and cut any loose threads you may has missed from the back.
Also give the quilt backing a final press if required.
Refer to Page 24 of the quilt pattern for basic instructions on making a quilt sandwich and basting.
Read on to discover different methods for making a quilt sandwich and basting.
What is a quilt sandwich? A quilt sandwich includes putting the three layers for the whole quilt together including the quilt top, batting and quilt backing in preparation for quilting the three layers together.
See Quilt Sandwich + Basting Pinterest Board for tutorials by some experienced quilters:
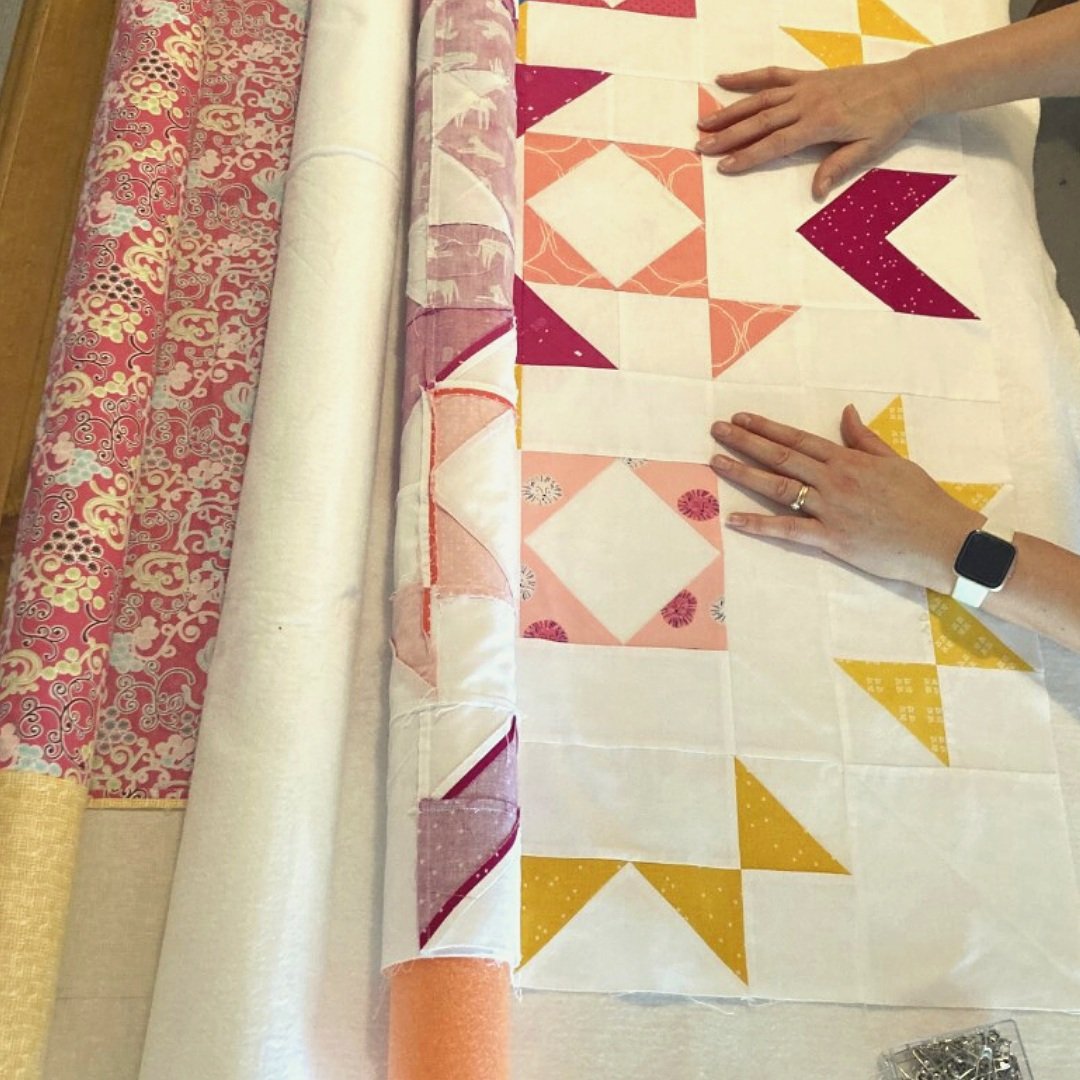
Discover how you can use pool noodles for making a quilt sandwich (my favourite option).
Other popular options for making a quilt sandwich include:
Laying out the quilt floor (My plan B for larger quilts).
Spray baste directly onto your quilt design wall.
Pin and spray basting tutorials.
Why do we baste? Basting holds together the three layers of the quilt sandwich.
Spray basting or pin basting? A personal choice and there’s a case for either method. I choose pin basting because I don’t like the spray fumes and it’s difficult to find somewhere that I can layout my quilt and spray.
What are the best pins for pin basting? The curved basting safety pins are specifically for basting quilts, with a bend in the middle making it easier to go through all the quilt layers. Most people choose a No. 2 size (1.5 inches), with other sizes available.
QUILTING
The method and design you decide on for quilting is a personal choice, with the pattern only suggesting to use a method of your choice. I’ve briefly outlined four options for quilting below, with a Quilting Pinterest Board that provides further inspiration and tutorials from other quilters including choosing thread colour.
Mabel, my quilting furry helper!
How to choose a quilt design? The design you choose will depend on many factors such as how you to decide to quilt, your level of experience, how much time you have, your budget and personal preferences.
QUILTING OPTIONS:
1. Hand quilting
A traditional method of quilting which is appreciated for its simplicity and chunky stitching.
Some people love taking their time to hand quilt, but this method is not for everyone!
If you love hand quilting but don’t have the patience to do an entire quilt, you can do a combination of both machine quilting and hand quilting some key elements.
2. Walking foot machine quilt
This is what I opted for the Cosmic Cactus quilt and as you gain confidence you can quilt some really wonderful designs.
You can start with simple straight line designs, such as the one shown below.
If you are serious about mastering walking foot quilting and trying more complex designs, then checkout the book called Master Machine Quilting with your Walking Foot by Jacquie Gering.
A walking foot and guide are attached to my sewing machine for quilting.
Marking out lines for walking foot quilting with a hera marker.
3. Free motion quilting
I find the idea of free motion quilting daunting and it’s something I haven’t tried yet!
Free motion quilting allows you to create some really interesting designs, but does require some practice.
If you are interested in free motion quilting, take a look at a few tutorials on our Quilting Pinterest Board, outlining the basics for a beginner.
4. Longarm quilting
Short on time or don’t have the patience for quilting? Most of us don’t have a longarm quilting machine at our disposal either, so you will need to find someone who provides this as a paid service.
You can achieve more complex quilting designs with a longarm.
Share your favourite longarm quilters in the comments below.
Jenn B Quilts one of our Part 7 sponsors, offers longarm services.
How did I quilt?
I used the simple quilt design (as seen in the pattern and shown below), with the quilt lines following the angled points of the star.
I selected a Signature 40 weight contrasting cotton thread in a colour called Camel.
Next I attached the walking foot attached and changed my needle to a 90/14 to suit the thread weight I’ve selected.
Before I started quilting, I did a test on a mini quilt sandwich I put together with scrap fabric and leftover batting. That way I could check I was happy with the stitch length and no adjustments needed to be made to my machine.
I started by marking an X through the centre of the quilt using a hera marker and then quilted the marked X lines.
I then decided how far apart I wanted the remaining lines spaced, marking out these lines using a hera marker. For example, I spaced lines 1 inch apart on the Baby size quilt and 1.5 inch apart on the Throw size quilt.
Then I quilted each quarter section until the entire quilt was finished.
Try this simple quilt design (as seen in the pattern).
Finished quilting the Cosmic Cactus Quilt.
MAKE YOUR BINDING
Read on to discover other options for binding your quilt or make a double fold binding as outlined in the pattern.
To make a double fold binding, follow the method outlined in the quilt pattern to join the strips (or see our blog here for further instructions). Below are photos showing the process I follow for making the double fold binding.
Draw a diagonal line.
Sew on the marked line.
Trim seam allowance to 1/4 inch.
Press seams open. Trim off dog ears.
Fold binding in half with wrong sides together. I like to use the 1.25 inch sasher for folding and pressing the binding (as pictured).
Consider using your leftover fabrics and make a fun scrappy binding as outlined in the tutorial Make a Scrappy Binding.
Check out other options for binding your quilt by other quilters on our Binding Pinterest Board such as single fold binding, using your backing for binding, big stitch binding and more!
How did I make my binding? I love to make a scrappy binding using my leftover fabrics to match my quilt.
ATTACH YOUR BINDING
We are just about done! For attaching a machine sewn double fold binding follow the directions in the pattern. If you’re looking for other binding alternatives for attaching your binding to the quilt sandwich, take a look our Quilting Binding Pinterest Board with links to tutorials from other experienced quilters.
Read on for some tips on attaching your double fold binding:
Before you start, trim off the extra batting and backing. To maintain your half-square triangle points, measure and trim a 1/4 inch from the points. This may mean you have a little extra batting and batting around the edges.
I recommend using Clover Wonder Clips instead of pins to hold the binding in place. They are easier to handle and allow you to make easy adjustments to the placement of the binding.
Don’t forget to overlap the binding by 10-12 inches half way along one side.
Choose a matching or contrasting thread to suit your project.
Miter corners are not as difficult as your think! 1. Sew up to the corner stopping 1/4 inch from the edge. 2. Pivot and sew to the very corner of the quilt. 3. Then follow the directions in the pattern for making the miter corner fold.
Joining the binding ends following the directions in the pattern. If you need further guidance, see our Quilting Binding Pinterest Board with some tutorials that provide further instructions (including video) to show how this is done.
Don’t skip pressing the binding out from the edge of the quilt.
Lastly, fold over the binding checking to see that it overlaps the stitching on the back of the quilt and secure in place with pins (or wonder clips). Stitch in the ditch from the front of the quilt following the binding seam line.
Stitching in the ditch from the front to finish attaching the binding to the quilt. I now use Clover Wonder Clips instead of pins to hold the binding in place.
How did you go finishing you quilt? I hope you have enjoyed joining me for my first QAL! Please share your finished quilts on Instagram using the hashtags #CosmicCactusQuilt and #CosmicCactusQAL as I would love to see them!
The GRAND PRIZE winners are:
Congratulations to our two lucky winners from our two awesome sponsors!
Winner of the Little Landscapes Trio PDF Pattern by Breeze Block Quilting is @diannaskillen! Congratulations Dianna!
Winner of the 50% off longarm quilting from Jenn B Quilts is @susanmarkhamvirtualassistant! Congratulations Susan!


